 It
began in 1988. I saw one of the first BMW R100GS models to hit Southern
California. I thought it had spartan accommodations but it was still
cool
(hey, I was riding a Gold Wing, all right?). At the time I thought of
all
the cool places I could take such a machine. It's not really a dirt
bike.
The R100GS is to a real dirtbike what a Jeep Cherokee is to a CJ7. They
can both go off road, but with the former you have to remember to go
slower
and just accept that it will work 90% of the time and you shouldn't
push
it the other 10%. If you stay within it's limits, it's a fun machine.
It
began in 1988. I saw one of the first BMW R100GS models to hit Southern
California. I thought it had spartan accommodations but it was still
cool
(hey, I was riding a Gold Wing, all right?). At the time I thought of
all
the cool places I could take such a machine. It's not really a dirt
bike.
The R100GS is to a real dirtbike what a Jeep Cherokee is to a CJ7. They
can both go off road, but with the former you have to remember to go
slower
and just accept that it will work 90% of the time and you shouldn't
push
it the other 10%. If you stay within it's limits, it's a fun machine.
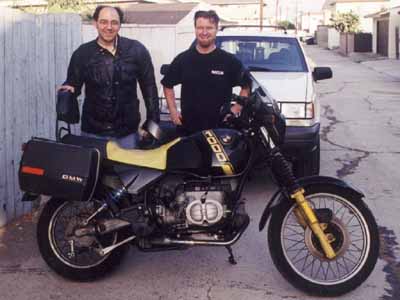
On a cool Saturday evening in October 1999, I was browsing the Recycler website and stumbled onto a 1988 BMW R100GS that seemed within financial reach. There was an email address listed, so I sent him a message innocently asking if it was sold or not. I didn't hear from him that night, Sunday, or Monday morning: I figured it was spoken for.
As I was sharing the story with friends, of the cool Beemer "that got away," I was almost relieved that I didn't have to talk myself out of purchasing it. After all, I didn't really have the money and I had just purchased a ZX11 five months earlier. After lunch, I popped out to check my email. Behold, the holy grail of messages, a reply from the BMW's owner. Yes he still had it and it was in San Pedro, California. So far, nobody had looked at it. After calling him, I understood why.
His name was Bill and you've never talked to a more honest guy. He started telling me about the history of the bike. He was the second owner and lived only a few blocks from the ocean. The bike had suffered from the moist, salty environment. Years of daily commuting and parking outside at work had also taken their toll on the cosmetics. There were lots of little mechanical problems. Nothing too serious but a lot of hours would be needed to "get her right again." As we talked, it almost seemed like he was trying to talk me out of coming to look at it, which I appreciated. It was just over 100 miles to his house and the weather was already getting cool at night. Nonetheless, I reassured him that I was mechanically inclined and was fully equipped to do the work, IF it was the right bike. I brought my voltmeter along to check the questionable charging system.
Upon arrival, it was as described. He had lots of new parts in boxes but his house restoration kept him away from doing any of the work. He was quick to point out the flaws of the bike. After a 10 minute test ride, we hooked up the voltmeter to check out the suspect alternator. As guessed, about a third of the charging system seemed to be inoperative. It could get to 13 volts but BARELY and only at sustained high revs. We both acknowledged that there was probably something wrong with the alternator. We ended up talking for a few hours before I headed home. We must have been brothers in another life I guess...
After working out my finances and a few more emails back and forth,
we settled on a price. I think it was a good deal for both of us. With
my background and tools, Bill agreed that the bike and I were a good
match.
 The
following Saturday, my friend Jarrett drove me down to pick it up. When
we arrived, I inspected it one last time in daylight and wanted to
check
the compression. The left cylinder was fine but the right one had
NOTHING.
After a few minutes of messing around, we hooked up a compressor blow
nozzle
to the spark plug hole. With the valves closed, you could still hear
AND
feel air hissing out of the exhaust pipe. Not wanting to get into major
engine work, I almost changed my mind. I didn't though. I was that
close
to my "dream bike" and I figured I could do SOMETHING to repair the
valves.
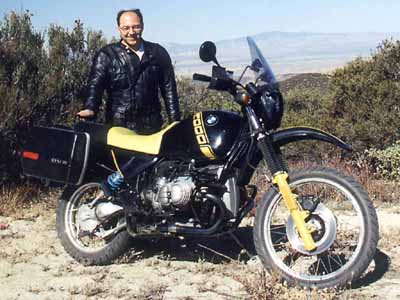
We went ahead with the deal. After Bill and I posed for a picture with
the bike, I was off on the 100 mile trip home, riding the bike I wanted
so many years ago.
The
following Saturday, my friend Jarrett drove me down to pick it up. When
we arrived, I inspected it one last time in daylight and wanted to
check
the compression. The left cylinder was fine but the right one had
NOTHING.
After a few minutes of messing around, we hooked up a compressor blow
nozzle
to the spark plug hole. With the valves closed, you could still hear
AND
feel air hissing out of the exhaust pipe. Not wanting to get into major
engine work, I almost changed my mind. I didn't though. I was that
close
to my "dream bike" and I figured I could do SOMETHING to repair the
valves.
We went ahead with the deal. After Bill and I posed for a picture with
the bike, I was off on the 100 mile trip home, riding the bike I wanted
so many years ago.
After arrival at home, the compression had seemed to improve. While hot, I got 110 pounds of compression on that bad cylinder. Unfortunately, it was almost none when things cooled down. Something was amiss, but I wasn't sure and I secretly hoped it would go away on it's own (yeah, right).
The bike only lasted 2 days before the charging system completely
died.
The total failure was the result of an open circuit in the rotor. The
previous,
partial charging problem was from 2 failed diodes in the rectifier
assembly.
Motorrad
Elektrik could rewind the bad rotor for much less than a new part
and
I figured I could do something about the diodes. Well, Motorrad
Elektrik
was behind schedule that week. It took a full 2 weeks to get my rotor
back.
If not for my impatience, I would have been fine with that, but with a
new toy, I wanted it RIGHT AWAY.
The time away, turned out to be good for the bike though. I decided that since I couldn't ride it, I could do a little work each day and by the time the rotor returned, I would have everything else in shape.
Work began with a good bath and Eagle One etching mag wheel cleaner. This stuff is amazing. It has a mild acid to etch away the oxidation from aluminum castings. After that, I got to work rubbing out the oxidized paint. The tank cleaned up pretty well. Originally, I was going to paint the bike up like one of the old Paris-Dakar rally bikes but the black tank looked so nice and shiny that I couldn't bring myself to do anything more to it. Next was the painted chassis. I began rubbing out the frame with a mild abrasive wax.
Back in high school, I took a motorcycle repair class from a guy named Marty Dickerson (better known as "Mr Vincent"). One of the best lessons I learned from him was that "a clean motorcycle is a well inspected motorcycle." It is SO true, because as I rubbed out the frame, a hairline crack was discovered near one of the saddlebag mounts. It was minor but it had to be fixed. "No problem" I thought to myself. "It's on the rear sub frame so I'll just unbolt it, weld it, then repaint it while it's off."
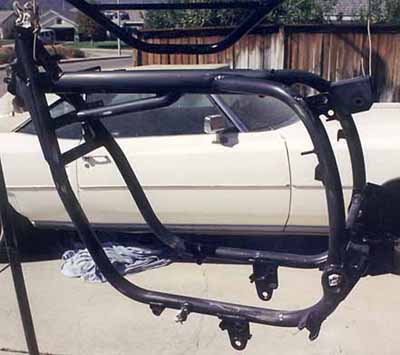 By this point, the seat and tank were already off, as
was the front
cover of the engine. After pulling the sub frame, I got to see just how
bad the paint was on the rest of the frame. I began justifying what I
was
about to do: "I've got to pull the fork anyway so I can clean the head
bearings, and I need to do the same to the swingarm, and at that point,
nothing is left but the engine and some wires..."
By this point, the seat and tank were already off, as
was the front
cover of the engine. After pulling the sub frame, I got to see just how
bad the paint was on the rest of the frame. I began justifying what I
was
about to do: "I've got to pull the fork anyway so I can clean the head
bearings, and I need to do the same to the swingarm, and at that point,
nothing is left but the engine and some wires..."
On day seven at my house, the BMW was stripped to it's bare frame and parts. By the morning of day eight, I was sandblasting and sanding every black chassis part on the bike. There would be no rust, no chips, no faded paint. After the prep work, I sprayed 3 wet coats of hardened acrylic-enamel paint on everything. It was leftover materials from one of my cars and it was dying on the shelf, so why not? The bike I planned to leave ratty, was turning out pretty nice.
The next 2 weeks were spent rebuilding everything as it went back
together--one
piece at a time. Nothing continued until the last item was done to my
satisfaction.
I rerouted the wiring 3 times because I didn't like the way it routed
around
the steering head.
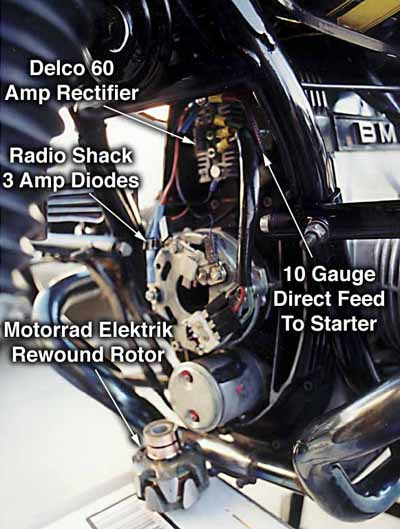 After
final assembly was complete, I was still waiting for the rotor to
arrive
in the mail. The last item to do was the diode assembly. The BMW part
is
fairly expensive and not very well designed (in my opinion). I decided
to retrofit a General Motors rectifier bridge to the front of the
engine
in the stock diode location. I made a fiberglass mounting pad for it
along
with aluminum standoff brackets. The GM rectifier can handle 3 times
the
current of the BMW part and I can replace it anywhere in the United
States
for around $10. What's more, I already had one so it didn't cost me a
dime
to install it. I picked up an existing ground stud for the negative
return,
then made my own wire harness for the alternator.
After
final assembly was complete, I was still waiting for the rotor to
arrive
in the mail. The last item to do was the diode assembly. The BMW part
is
fairly expensive and not very well designed (in my opinion). I decided
to retrofit a General Motors rectifier bridge to the front of the
engine
in the stock diode location. I made a fiberglass mounting pad for it
along
with aluminum standoff brackets. The GM rectifier can handle 3 times
the
current of the BMW part and I can replace it anywhere in the United
States
for around $10. What's more, I already had one so it didn't cost me a
dime
to install it. I picked up an existing ground stud for the negative
return,
then made my own wire harness for the alternator.
When the rotor finally did arrive, the system worked flawlessly. I
managed
to get the charge light to go out just above idle (around 1100 RPM).
After
2 weeks of waiting, I FINALLY took the bike out for a ride.
 It was a short
lived joy though. It still wouldn't idle. After about 15 miles, I
hooked
up the vacuum gauges to find almost no vacuum on the right cylinder.
After
accepting that I needed to pull off the heads, I did it. Not a
bad
job overall, considering that from a running motorcycle, I got all 4
valves
out in 45 minutes. The simplicity of the design is still one of this
bike's
best features. I have been emailed numerous times over the years on
this installation.
I was cheap when I installed this and had more time than money. If you
own an Airhead Boxer and want to upgrade, consider the Thunderchild
diode system (basically the same as my installation noted here). If you
REALLY want to upgrade, Motorrad Elektrik sells a high output
replacement alternator that will run your electric vests and everything
else. It's pricey but worth it.
It was a short
lived joy though. It still wouldn't idle. After about 15 miles, I
hooked
up the vacuum gauges to find almost no vacuum on the right cylinder.
After
accepting that I needed to pull off the heads, I did it. Not a
bad
job overall, considering that from a running motorcycle, I got all 4
valves
out in 45 minutes. The simplicity of the design is still one of this
bike's
best features. I have been emailed numerous times over the years on
this installation.
I was cheap when I installed this and had more time than money. If you
own an Airhead Boxer and want to upgrade, consider the Thunderchild
diode system (basically the same as my installation noted here). If you
REALLY want to upgrade, Motorrad Elektrik sells a high output
replacement alternator that will run your electric vests and everything
else. It's pricey but worth it.
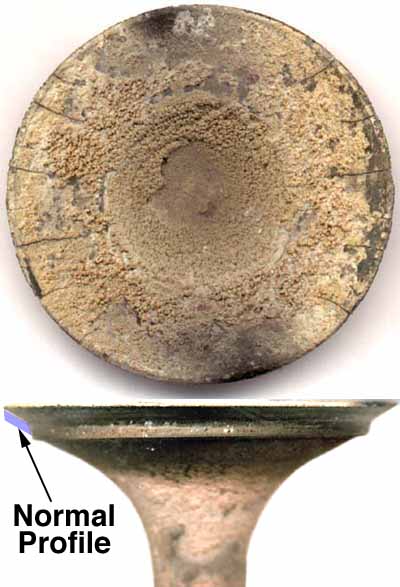
The idling, compression and vacuum problems were all related to something I have since discovered is chronic to ALL of the Air-Head boxers--receding exhaust valves. Both exhaust valves had HUGE steps worn in them. The right one had also cracked around the periphery, partially burned and was curling the now knifed-edge. For those not familiar with how a good valve should look, the blue area in the photo shows the material that SHOULD have been there. A call to San Jose BMW netted stainless steel replacements for $32 each. I opted to only replace the exhausts and to lap them to the existing seats rather than recut them. For all who scoff at the idea, all I can say is that the seats looked good, gave me a good pattern on the valve when I lapped them and have worked perfectly for the past 2000 miles. Besides, I was trying to get this finished inexpensively.
Well that was what the Beemer needed. After reassembly, the engine
ran
famously. Finally, I could get a stable idle and it had great low end
torque.
At last, I could start the last of the little fixes. The 1 year old
Works
Performance shock had long ago belched it's contents out past the seal.
Bill was not thrilled with the quality of a shock that would do this.
Neither
was I but a rebuild on this shock was certainly cheaper than ANY other
option. Works rebuilt it but only after telling me that the shaft was
scored
and needed replacing ($55) not to mention the seal and servicing ($75).
Since I was having to eat what should have been a warranty fix, I
decided
I would get a remote reservoir added on, just so I would feel like it
was
done for the sake of "upgrading" the shock. Just over $200 later, I got
it back. I will admit that it is a nice riding shock, even after hours
of off road pounding.
Unfortunately, this bike suffered an unfortunate death. The
restoration work was done just as Winter was setting in. I got one or
two fire road trips out of the bike before spring. The first weekend in
March 2000, I changed the oil, adjusted the valves and had the
bumblebee ready to go to Death Valley. The following Thursday, I met
some mountain biking friends up in Angeles Forest. It was a good
shake-down ride. The weather was uncharacteristically warm for spring.
I had dinner with one of the guys before heading home. On that fateful
ride home, a 17 year old girl turned left in front of me on a 50 MPH
major road. I swerved to avoid the accident but she continued left and
didn't know I was there until I was flying over her hood. The bumblebee
swung its left side into her car. The saddlebag exploded on impact, my
knee smashed the steel tank down to the frame on the right side. I
cleared the hood and landed on the other side with a shattered ankle,
sprained wrist, bruised ribs and a host of other less serious injuries.
Unfortunately, the Bumblebee is no more. It's sitting in the garage.
Most of the parts to put it back together are there but the nicer parts
have been pilfered for the Paris Dakar. Well, maybe someday.
The Bumblebeemer's Trip to Sawmill Mountain